SQL Server Express 2012 & Visual Studio 2010
This tutorial will show you how to install MS SQL Express 2012 (RC) and synch it up to Visual Studio 2010.
Before we start you will need the following.
- Visual Studio 2010 (already installed) – Must have SP1 installed prior to the MS SQL Server 2012 Installation.
- MS SQL Express 2012 (downloaded, but not installed – download it from here)
- Choose the version to download as “Express and Tools.” This will give you the the Database and MS SQL Server Management Studio Tools.
Installation of MS SQL Express 2012
- Double click on the executable file that you downloaded. The program will start “Extracting Files.”
- You will get the following screen. I selected “New SQL Server…”
NOTE: If you have 2008 you might consider upgrading, but remember you will have to have the SP2 of 2008. - Click “Next” on the following screen.
- In the next screen accept the license agreement.
- In the “Feature Selection” I am keeping the defaults. Click “Next.”
- In the installation rules it will check to see if you have the latest Visual Studio 2010 SP1. If you receive a “Failed” you will need to install the SP1 before you proceed. Click “Next.”
- After the installation Rules you will be presented with the following screen. I have selected to have the default instance. The default instance name comes up as MSSQLSERVER. Click “Next.”
- The next step analyzes your hard drive space. Click “Next.”
- The next screen shows the password for the accounts. I have left these blank. Since this is a local database that will not be used for production sites this is acceptable. Click “Next.”
- Now you are prompted to enter in a password. I have chosen Windows Authentication. I have also put my login as the SQL Server Administrator. “Click Next.”
- Click “Next” on the Error Reporting step.
- Then the installation rules will run. Hopefully no errors will show up. Click “Next.”
- Now the SQL Server is finally installing itself. This might take awhile, definitely enough time to grab a soda and a snack.
- After that you should see a bunch of items that were installed with the “Success” as the status. Click “Close.”
You are now finished installed MS SQL Server 2012 Express.
SQL Server Management Studio Tools
When the MS SQL Server was installed it should have also installed the MS SQL Server Management Studio Tools. We will open that and add a new database.
- Open up the newly installed MS SQL Server Management Studio Express (this should be in the Microsoft folder “Microsoft SQL Server 2012” located in your “Start Menu –> Programs”).
- When it opens you are prompted to “Connect to Server.” The default should be, “Windows Authentication.” Click “Connect.”
- Here is what you should see.
- To add a database, right click on the Database Folder. You will see “New Database…” Click on it.
- Insert the name for your new database. I will be naming mine “SampleDB” for this particular tutorial. Click the “Okay” at the bottom of the page.
- Now you will see you new database in the menu. If you don’t see it, right click on the “Database” folder and select “Refresh.”
- Right click on the “Tables” folder and select “New Table…”
- You will then be presented with a main section for creating a new table.
- I add one column called “intID” with a Datatype of INT for the puporse of this example. Click “Save” or ctrl + S
- You will then be prompted to name your table. I named mine “SampleTable.”
- Expand your “Table” folder and you should now see you new table there.
You have now set up a database and a table using the MS SQL Server Management Tools.
Linking Visual Studio 2012 to the Database
- Open up your Visual Studio.
- On the menu at the top click the “View” option.
- Select the Server Explorer or use the short cut key “ctrl+W,L”
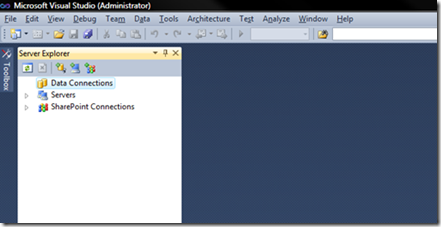
- This will open the following panel:
- In the Server Explorer panel you will click on the small DB icon

- You will be prompted with the following screen. Select the “Microsoft SQL Server” option and click “Continue”
- In the following screen you will need to add the server and the database. We are keeping the Windows Authentication for the logon (we set up the MS SQL Server with Windows Authentication). Click “Okay.”
NOTE: The server name is normally the name of your PC. - Once you have clicked “Okay” you should see this in your Visual Studio 2010 Server Explorer
Congratulations you have linked up your Visual Studio 2010 with your MS SQL Server 2012.


Comments are currently closed.